Welcome to the seventh week of my Summer Crafting series. Every Friday for the next 3 weeks, I’ll be sharing easy crafts you can make over the weekend. Be sure to check back each week for new projects!
This week is also week two in my How to Make an Art Journal series. I made the leaves out of book pages last week so you’ll need to have those before we get started on today’s project. (Click here for the leaves tutorial.)
I’m one of those people who loves to keep a journal. The process of writing in it is both cathartic and a habit for me. When I was in first grade, I received my first journal and promptly set to work filling it up. Admittedly, that didn’t happen but the pages that I did write on are pretty amusing. Somehow I thought I needed to share about the weather as well as apologize if I didn’t write every day. There are a lot of apologies.
These days I write when I feel like it. There are seasons when I write volumes and seasons when my journal gets dusty (i.e. when my daughter was little, I only popped in to write quick thoughts about her…the rambling tomes were definitely not happening at that moment in my life.)
I guess what I’m saying is, for me, journal-writing has never been a chore. It isn’t something I feel I have to do. I don’t have rules about what I should write which is actually quite nice. Maybe I’m saying all of this because I often get raised eyebrows when I mention journaling (though it rarely comes up.) Many people seem to think it’s a difficult and arduous thing. Believe me, if it was either of those for me, I wouldn’t be doing it. 😉 I guess it’s like my sisters and parents who are basically master gardeners. It isn’t a chore for them because they love it. It’s relaxing and enjoyable and that’s what journaling is for me.
But I digress. You came here to learn how to make an art journal cover not hear my little diatribe, right? Well, let me get to it. I began making journals years ago because it was so easy and fun to completely customize my journal. I’ve made several different kinds but I’ll be sharing how to make an o-wire journal for this series since I received a Bind-It-All machine for my birthday in June and want to see how it works for journal-making.
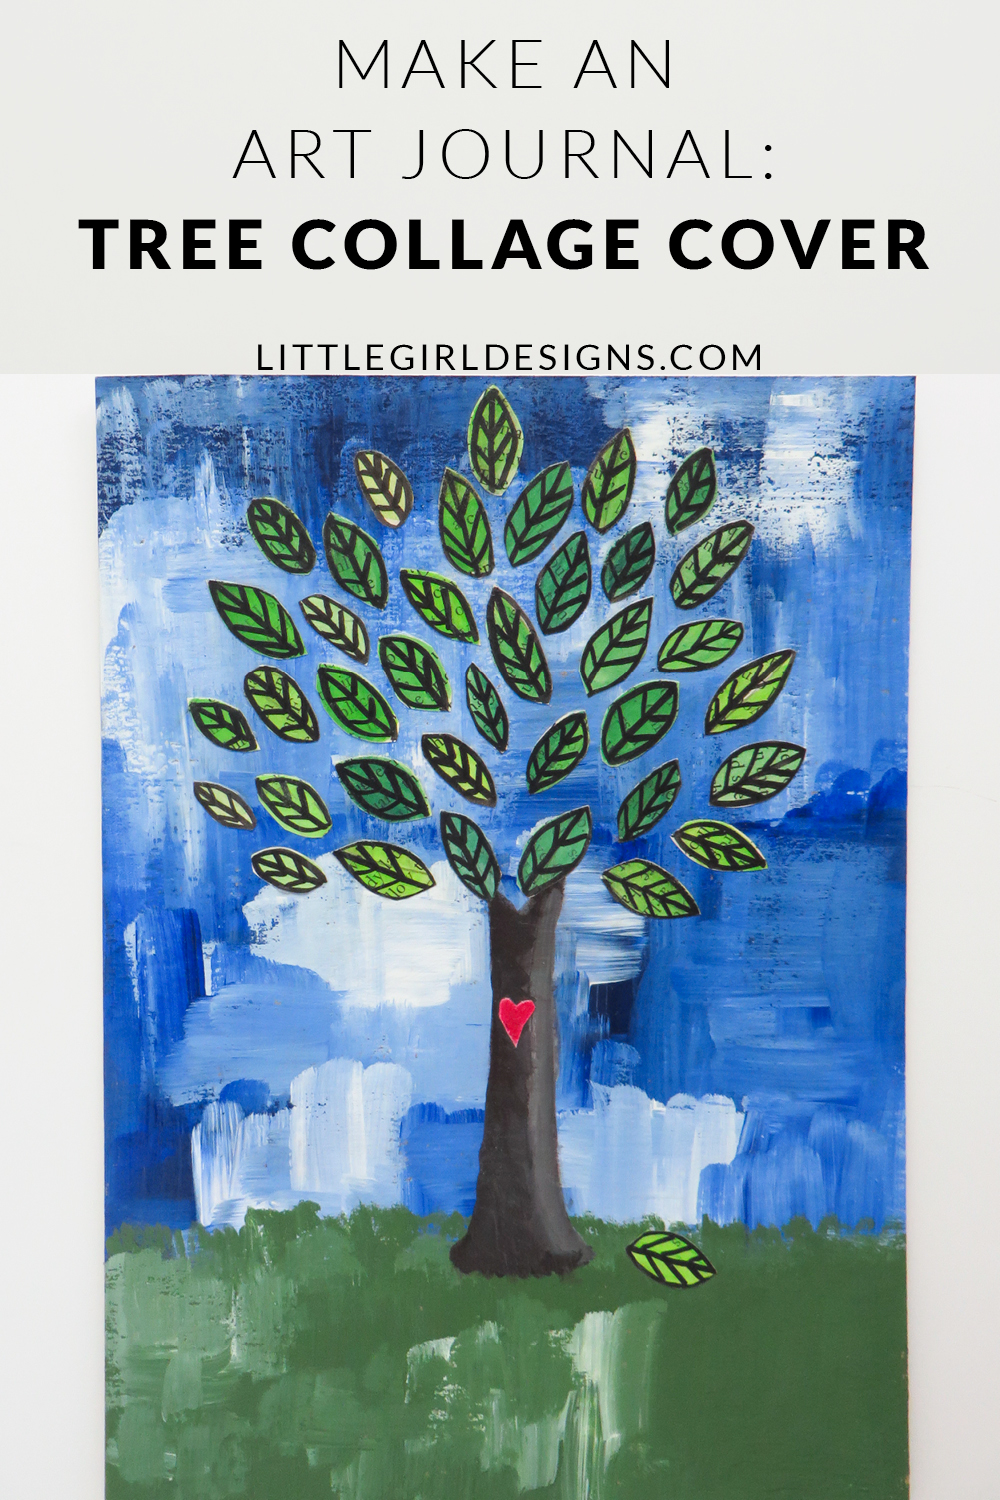
I love the beauty and imagery behind trees so I thought I’d make a tree for the back cover of my journal. We had several sheets of chip board in our art drawers that were originally the backing to various pads of paper, so I decided to use what I already had on hand and make my cover from those. You could also buy chip board that is cut to the size you want at your local craft store or online. If you’d rather not make a journal but like this tree collage, you could make it as a stand-alone art piece for your home.
Make an Art Journal Cover: Tree Collage
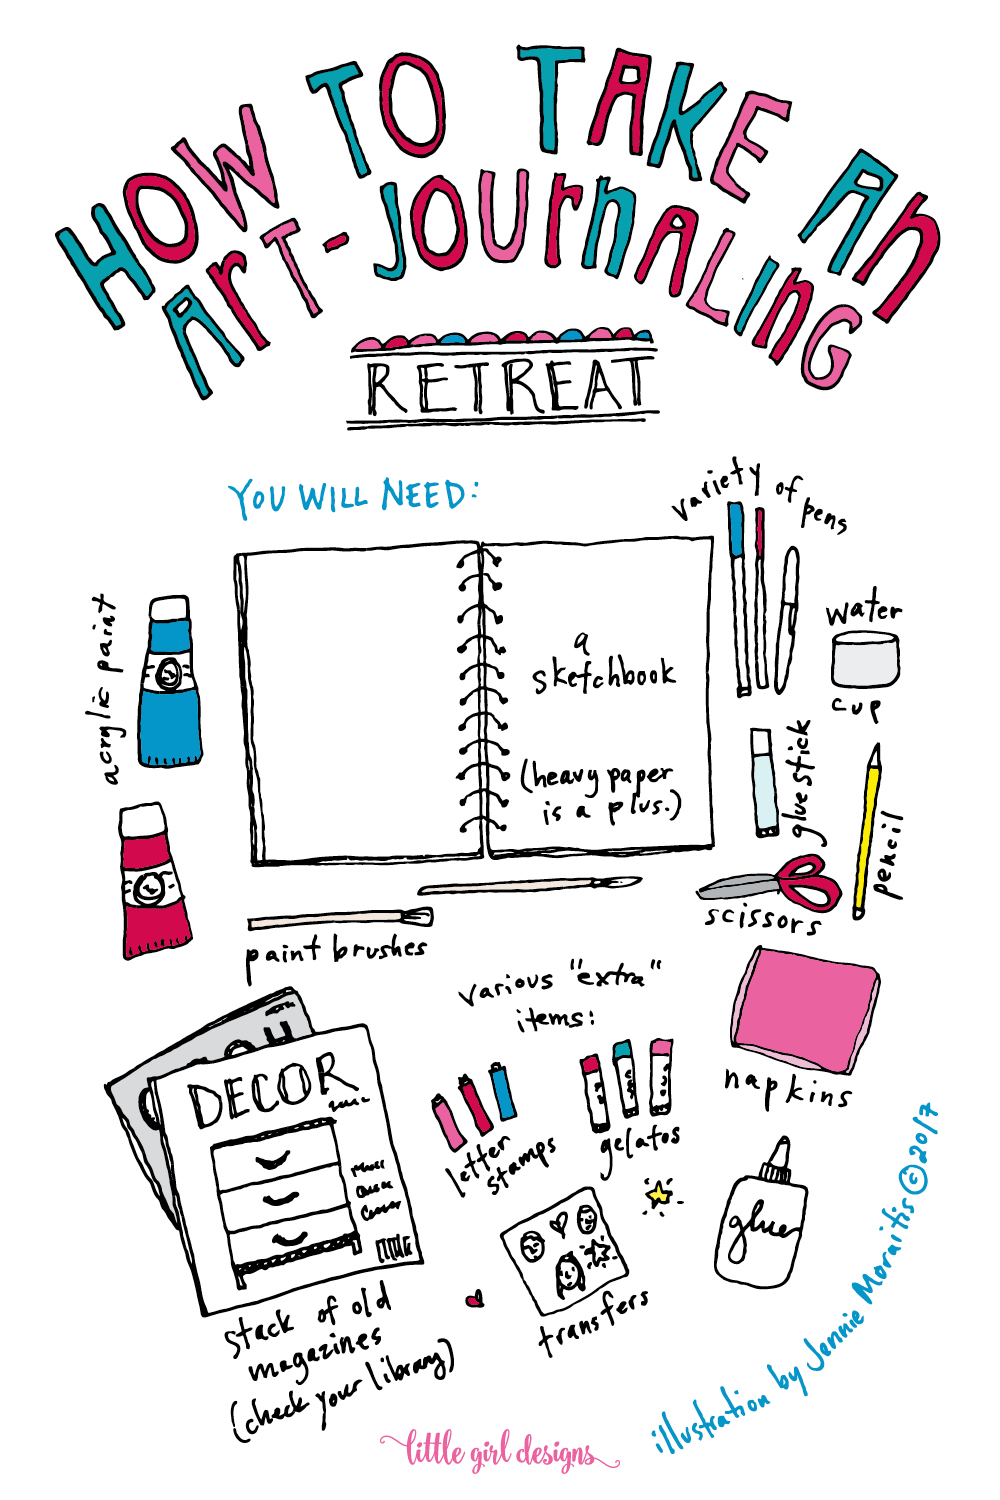
For this part of the project, you will need:
Chip board (i.e. this is the thick backing for pads of art paper; you can also buy it pre-cut)
Acrylic paint in dark blue, green, white, and brown
Book leaves
Paintbrush (medium to large to make bigger strokes as pictured)
Glue stick
White glue or Modge Podge
X-Acto knife (if your chip board isn’t cut to size)

First, I traced an older journal on the chip board as a guide. Make sure you think through how you want to bind your journal before you start your art piece.
Pictured above is my first try which I didn’t really like, but I wanted to show you so you can get an idea of what I was doing. I dipped my brush in dark blue paint and then into white paint to both lighten the blue and to make it multi-colored as you see. Because I was painting with a large brush, I was able to paint the area fairly fast. I rinsed my brush and then painted the green grass below and then set it aside to dry. After it was dry, I used brown paint to draw the tree trunk and a green oil crayon to add texture to the grass. It was at this point that I realized I didn’t wan to make my tree at this angle because I would only be able to add about 10 leaves before I ran out of space. Learn from my mistakes. 🙂

For my second attempt, I decided to paint using hash marks (for lack of a better term.) The first painting looked flat so I loaded my brush with more paint and tried this instead. I really like how it turned out. Again, I waited until the blue and green paint were dry before painting the trunk. (You could also do each of these elements separately: paint the sky, wait until dry; paint the grass, wait until dry, etc.)
You can see with the trunk that I used a little bit of white paint to make the right side of the trunk lighter. After the trunk was dry, it was time to add the leaves to my tree.

My daughter saw me photographing the tree and couldn’t resist coming over to play. 🙂 I arranged the leaves on my painting and used a glue stick to stick them down. This allowed me to step back and rearrange as needed. Use as many or as few leaves as you want.

I also used a heart (that I made for the back cover art) for the trunk because it was too cute.
At this point, I poured glue onto a tray and carefully painted it over the leaves to seal them. If you painted the leaves with gouache, you need to be very careful here because the paint may smear. This is also why you need to use a waterproof pen to outline the leaves. I used acrylic for the background and gouache for the leaves and didn’t have any problems with smearing.
You don’t need to paint over the entire board; just paint the individual leaves making sure you get a little bit of paint underneath them as well so they stick properly. At this point, the leaves will be rather white because the glue hasn’t dried yet. Don’t worry. It will dry clear and leave a lovely texture of clear paint strokes behind.
If you’re not using pre-cut chipboard, use a sharp X-Acto knife to cut it to size.

Here’s the finished art journal cover. I love how it turned out! In the future, I may hand-letter a quote onto the grass, but for now, I’ll keep it as it is.
A note: depending on the thickness of the chipboard, it may warp a little bit. You can remedy this two different ways: put a piece of parchment paper over the painting and press it with heavy books for a few days or paint the back. I decided to paint the back with yellow and white paint so I could have a nice interior cover. (And since the colors I used are light enough, maybe someday down the road, I’ll write or collage over those as well.)
Well, that’s it! Be sure to stop by next week because I’ll be showing you how to make a mommy and me portrait cover. I think you’ll really like it.
Have a lovely {and creative} day!
P.S. This would be a great project to do on a creative retreat!