
There’s just something about projects that are on a miniature scale that makes them extra cute, don’t you think? I really love embroidery projects and while I am working on one right now that will take me a little more time (but it is gorgeous and well worth it), I wanted to make a fast project to add some decoration to a tiny grapevine wreath that I have hanging in the living room. One Sunday afternoon, I pulled out my embroidery thread and a bit of muslin and the next thing I knew, I had these little guys made!

Make Your Own Embroidered Ornaments
I don’t think it has to be Christmas to make ornaments, do you? I have several that I keep out year round because they are so pretty. For this project, I only needed a few craft supplies. Here’s what you will need:
1 tiny piece of muslin or cotton
Scissors
Embroidery Transfer Pen
One strand of embroidery floss (I used red for the heart and dark gray for the little
girl)
Embroidery needle
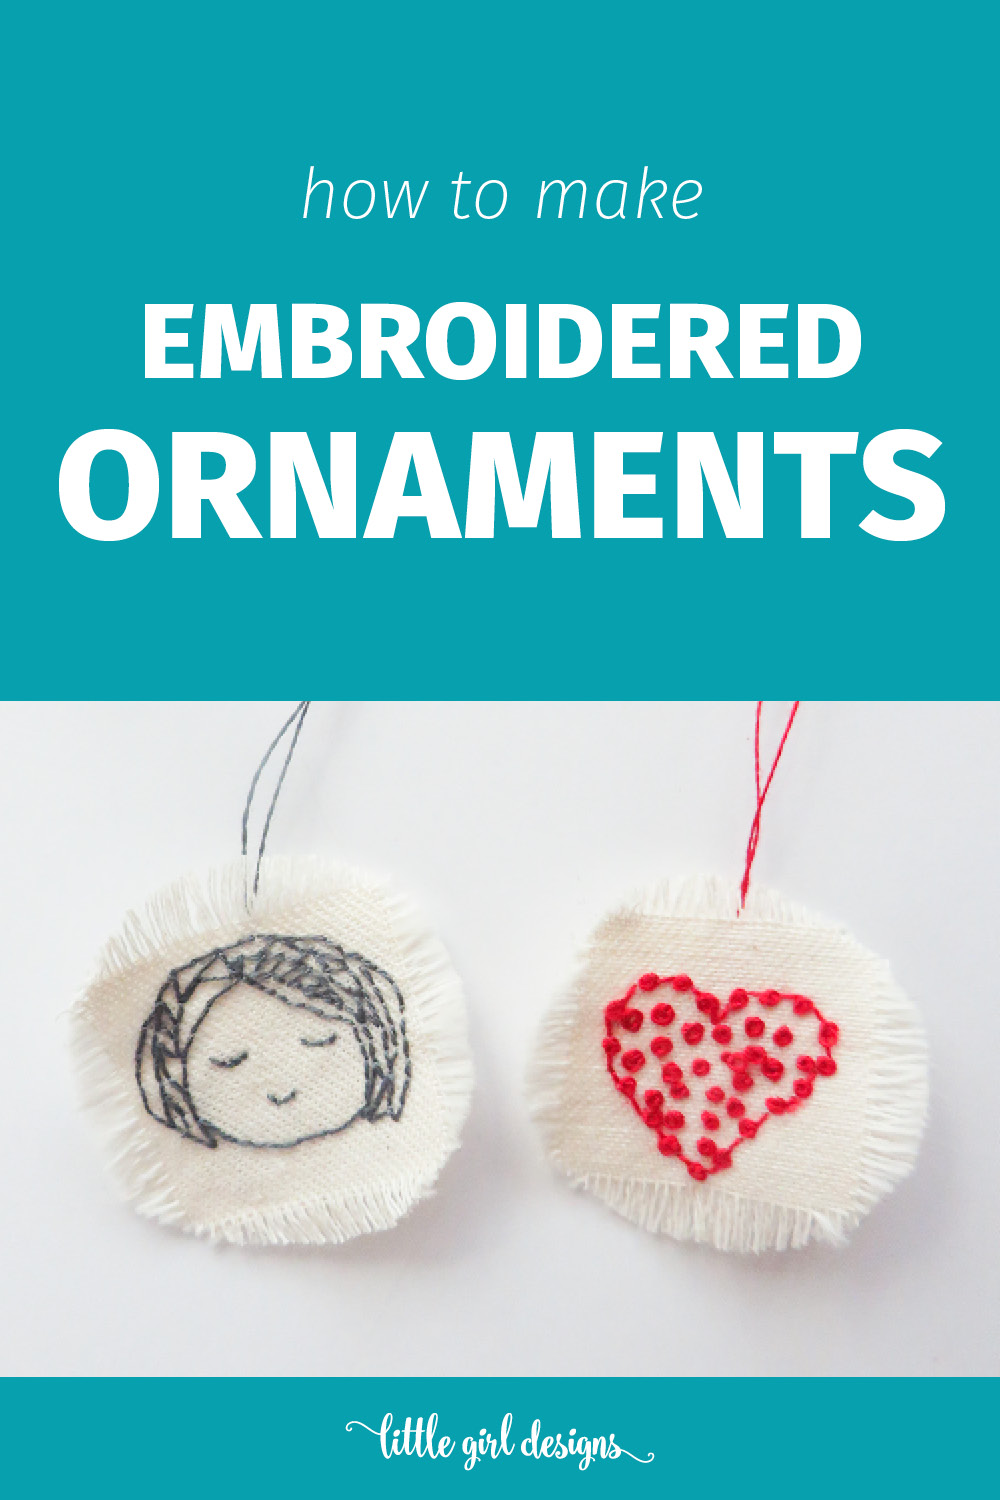
First, I cut a small circle out of the fabric. My ornaments are about the size of a quarter but I cut them slightly larger, knowing that I would fray the edges.
I then drew my design onto the fabric using an embroidery transfer pen. I love these pens because you draw your design directly onto the fabric and when you’re done, you only have to rinse the fabric with cool water. The pen ink will wash away. This project is too small to be worked in a hoop so I just carefully back-stitched onto the fabric. (If you need to know how to make a back-stitch, you can learn how to do so here.)

The back-stitch is my favorite stitch because it is kind of like line drawing. Very simple and sweet. Make your stitches extra small as you make the eyes or anything circular. For the heart, I made french knots and then connected them on the outer edge with a back-stitch. Granted, it probably is not a real one because the stitches do not run into each other. I just wanted the heart to have more shape. (Here’s how to make a french knot.)
I took a piece of floss and looped it into the back of the embroidery (being careful to not go through the fabric completely) and then tied it on the top so I would be able to hang it from my wreath. After I was finished, I carefully frayed the edges of the piece. I did this because I figured they would fray anyway and because it was such a small piece, I had trouble trying to finish the edges with a different embroidery stitch. I then rinsed the fabric to remove the embroidery pen markings, and let the ornaments dry completely.
By the way, if you use a very thin fabric, you will want to back it with a bit of stabilizer. That way you won’t see the stitches through the fabric from the front. I forgot to do this step because I was having too much fun so my stitches slightly show through. Oh well. I still like them!
Here are some more easy crafts, many of which you can whip up in an afternoon. Enjoy!


33 responses to “Make Your Own Embroidered Ornaments”
Those are SO adorable! Love them!
Thanks, Hannah! 🙂
How adorable! What a great idea for personalizing baskets, bags, back packs, gifts … oh my goodness, the possibilities are endless!
Seriously! I’m all about making little embroidered images on all things. I have so many ideas to share! Thank you for stopping by! 🙂 🙂
This looks like a great project for little hands during read aloud time.
That’s a good idea, Jenny. 🙂 Thanks for stopping by. Have a great week! 🙂
This is so cute! And the perfect sized project for any kid to complete too.
These are so cute and delicate! They look adorable on that wreath…I think they would also be cute hanging on dresser knobs. Thank you for sharing your creativity with us.
Thanks, Laura! 🙂
This is such a sweet idea! Love that it doesn’t have to be just a Christmas craft. I should make some easter eggs and little spring chicks! These turned out SOOOO pretty, Jennie!
Stephanie @ http://www.mommyzoid.ca
PS: You should totally come linkup at the Ladies Collective Linkup over on my blog! It happens every Wednesday! <3
Thanks so much. I love your idea to make Easter eggs & spring chick ornaments! Those would be too cute! 🙂 (now I want to make some!) And thanks for the invite to your linkup–I’ll be right over!
What very nice little embroidered ornaments. Glad to have seen your blog, our work has cuteness in common, hi. Keep up the nice work. passing by from “Two Uses Tuesday Link Up 18”
Just visited your blog and love your creativity! Your designs are just wonderful. Thanks for stopping by! 🙂
What a beautiful site you have here! I’ve journeyed through many of your posts. I love your creativity and absolutely adore the graphics you’ve created.
Lisa, thank you so much! I was so encouraged by the post I read of yours today about St. Patrick…I ended up browsing through your site too! Thank you so much for stopping by. 🙂 🙂
How fun and elegant and creative!
Happy Weekend coming to you,
artmusedog and carol
Thank you! Have a great weekend! 🙂
Adorable! I would love to get my daughter to try this.
Thanks, Kim!
So simple and beautiful! I love them! Thanks so much for taking the time to join us at the #HomeMattersParty – we hope to see you again next week! Feel free to bring a friend 🙂
Thank you! 🙂 I’ll be there! 🙂
How cute! My girls would love making these little ornaments and I always have lots of leftover fabric. Thanks for sharing on #MerryMonday.
Thank you! I think they would have fun making them. Thanks for stopping by! 🙂
Oh my goodness how cute are those?! My daughter would love to make something like that. Really great idea!
Thanks so much, Tiffany! 🙂
I’m loving this! You always bring such amazing things to our party. Pinned and tweeted. I hope to see you tonight at 7. I can’t wait! Lou Lou Girls
Thanks so much! 🙂
These are amazing! Love them! Thank you for sharing on Show Me Saturday!
Thank you so much, Lindsay! 🙂
These are darling! I’m anxious to try it out. Just wanted to let you know that it is being featured at this week’s link party. http://www.thelifeofjenniferdawn.com/2015/03/a-little-bird-told-me-link-party-131.html
Thanks so much! 🙂
These are so, so sweet 🙂 Thank you for linking up to Creative Spark each week 🙂
Thanks, Emily! 🙂